
HANDLEBAR MOUNTED COUNTER

Tom is visiting this weekend, and he brought a show-and-tell. He has been in contact with a person who wants to adapt a Jones Counter to his moped. He shipped his cable to Tom, and Tom adapted a counter to it. It’s still going to be a back-and-forth process with the moped guy, but it shows promise.

In addition, Tom is in contact with a potential customer who is willing to work with him on a volume buy of handlebar mounted counters for a bicycle. Up until now, development cost for a single unit has been a hurdle, but there may be a handlebar-mounted unit available in future.


Here is the cable and counter for the moped
Last edited {1}
Original Post

Replies sorted oldest to newest

The counter used on the JR counter is a Veeder-Root model 745815-001. The manufacturer’s speed limit on these counters is 500 rpm. Since the counter records 10 counts per shaft revolution, this is a limit of 5000 counts per minute. Using a riding constant of 10,000 counts per kilometer this yields a limit of 30 km per hour riding speed, or 18.6 mph.

In Tom's test of the JR, he ran the prototype 500 miles at a speed of 20 mph with no perceptible bad effects. This suggests that the manufacturer's limit is conservative.

The moped in question has an unknown gearing to the wheel end of the drive cable. The speed limit for this moped will have to be found by determining the counts per kilometer of the installed drive. This is easily done, and will provide the user with a suggested limit for his riding speed.

Note: Just talked with Tom. He has already discussed this with the guy, and it appears that overspeed will not be a problem. Efforts will be made to get some photos and operational data.

Experience with previous counters suggests that the weak spot in the counter assembly is the central drive gear bearing, where the big gear rotates against the cup retainer. The counter itself may still be in good shape when the chassis wears out.

See: Counter speed
Last edited by peteriegel
Let me echo Tom.

I've remounted my JOL because I like the readout at handlebar level. I had no issues with the JR. It certainly beats the old Jones Counters I was using. But if i don't have to look down to hub level to read the counter, I choose not to.

The weak link on the JOL, at least for me, was the cable. I've broken at least two of them, and I think the problem was that the cable had to curve at too tight a radius to stretch from my hub to my handlebar.

A cable even a few inches longer would work allow a more comfortable handlebar mount- and probably would be more reliable.
The scooter-counter assembly I provided cost him over $200, and he provided the speedometer cable. It required the aid of a machine shop to produce a very special threaded rod about an inch long, $75 for the piece. He did pay more than I asked for labor, but I probably had at least a couple days of effort designing, searching for components, and assembling the unit.

I've got a couple lines of thought I intend to follow in the development of the handlebar rig, but both of them depend on working within the inventory limitations of the supplier I've found. I will certainly be able to manufacture any length cable that is required, but hope to make only one or two lengths.

I also hope to utilize the chassis from the existing design, but may not be able to given the other design constraints. Durability is a key factor, as is cost, and complexity. Aesthetics may have to take a back-seat. My first attempt will be to have the cable leave the hub parallel with the axle, and loop to one side before going to the handlebar.

I'd like to make one that follows the forks up to the handlebar like the JOL, but have yet to be able to make the 90-degree bend with anything like a proper connection.

The upshot is cheap and easy will be ugly, robust and elegant will be costly and time-consuming to design.

I'll post updates as they happen. I've ordered a small collection of cable bits to test, and expect them in a couple weeks.

Tom
In my first attempt to make a 90-degree drive for the cable rig, I tapered the teeth on the Delrin gear. I met with limited success, but the process of tapering the gear meant many minutes with a Dremel tool. Engagement was poor, and the gears tended to bind somewhat.

My second plan was to bend the teeth on the metal gear 90 degrees. This required putting a z-bend in the chassis to add clearance for the teeth. This done, a new flat gear was fitted, and fiddled with it until I was satisfied it would never spin freely.

After realizing that the effective diameter at the line of action of the gears must be preserved, I bent the teeth to something resembling a 45-degree angle and adjusted the Delrin gear’s position as shown in the pictures below. The resulting assembly does not bind, and spins freely up to 1200 rpm.


The next challenge will be to attach a cable to the shaft with a sturdy connection.
Last edited by peteriegel
I was able to build on the previous assembly to produce a working model.
Using a 1/8” steel shaft and two 1/8”x5/16” bearings I mounted the 3/16” Delrin gear into a sandwich of ¼” Delrin. The protruding shaft was cut to nest inside a moped speedometer cable I ordered a while back, and the slotted connection allows for minor misalignment of the shafts. A bulkhead was fashioned by counter-boring a bolt, cutting it to length, and threading it into another layer of ¼” Delrin. See below.


The assembly is sturdy, and mounts to an unmodified chassis used in the base model.


It fits on a bike, and the cable comes up in the plane of the front wheel. It doesn’t follow the fork at all, but it is better than sticking out sideways.


Spinning the wheel slowly shows the rig operates with very little friction.

I’m off for a test ride, more as it develops.
Last edited by peteriegel
I put about 10 miles on it this morning and it seems to be holding up fine, no signs of wear or tightening up.

It is a bit more massive than I'd like. Not quite a kludge, but not exactly a fine instrument either. I can say it works, it spins almost feely with no cable, and during the ride I grabbed the cable with my fingers to see if it would misbehave. It didn't skip a tooth or jam in any way I could tell riding.

I need to look into the cable connections a bit more closely. I hope I can buy some that fit a bolt that is readily available to keep cost down.

I'll let you know what I find out.
When a new counter is mounted it gets squeezed by the axle assembly, whether it's a nut-on-axle or a tension rod through the middle. The grommet will yield a tiny bit as squeeze is applied, as the grommet installation leaves a tiny amount of harmless slack in the assembly.

The assembly will not be damaged if it is squeezed very tightly by the axle. Once the slack is removed all the residual clearance is eliminated.
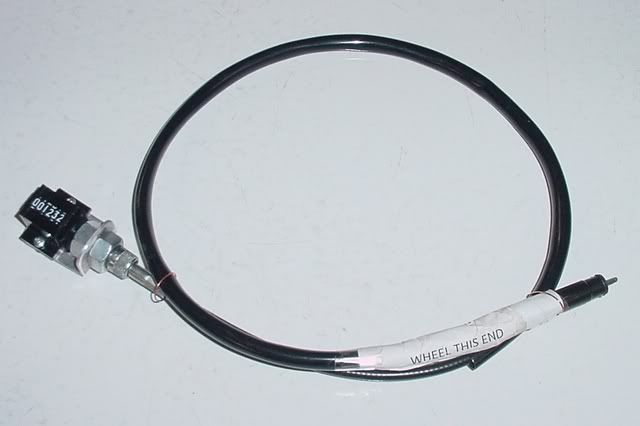
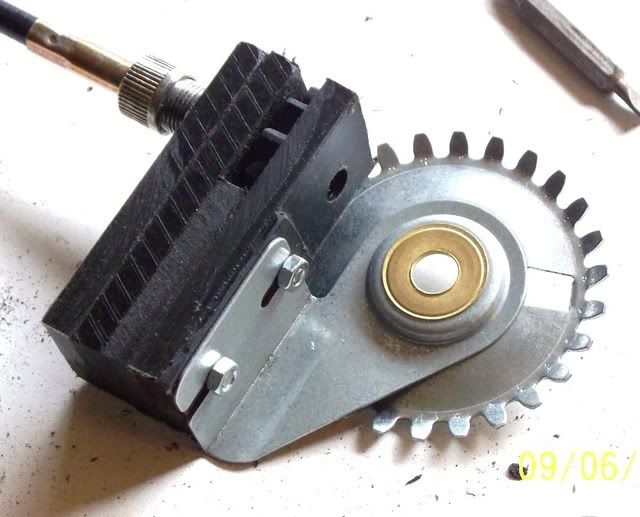
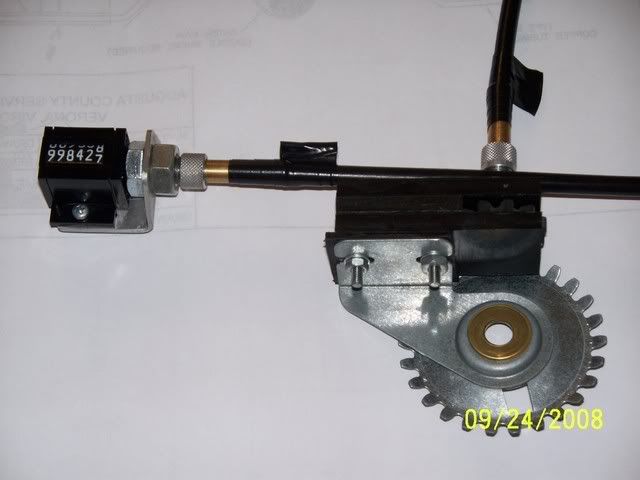
I got all the pieces/parts I ordered, and cobbled together a complete cable-mounted counter.


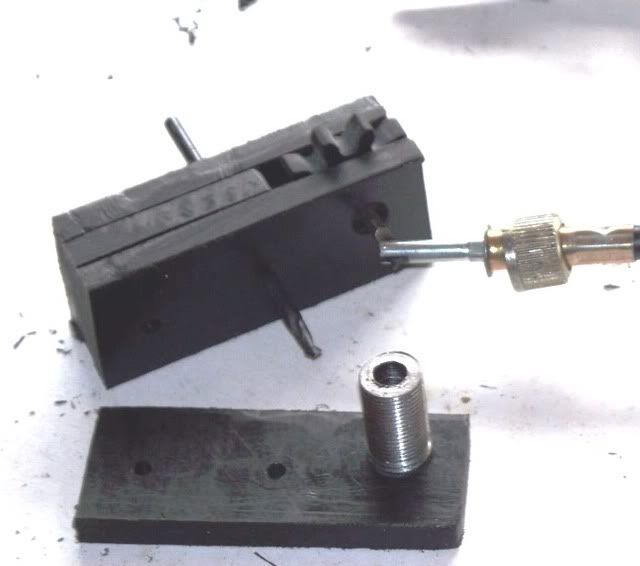
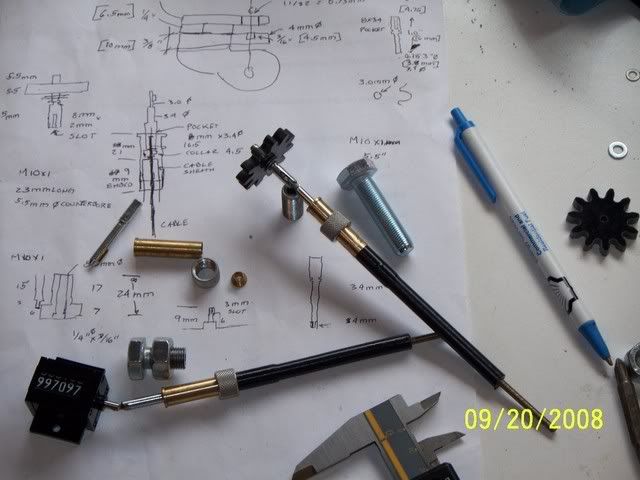
The threaded nut used to join the speedometer cable to the counter and chassis is a M10x1.0mm bolt, 40mm long that must be counterbored with a 6mm hole and cut roughly in half. Here are most of the pieces in the disassembled state.


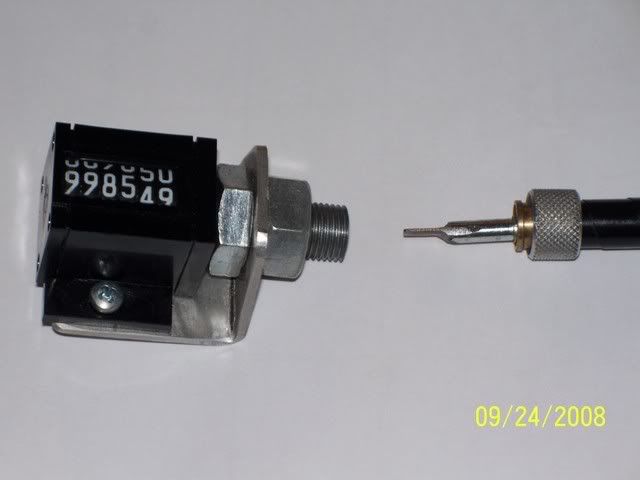
The cable-ends that transfer the rotation start out as 0.156", and must be whittled down with a dremel tool to fit on either end. The notch in the Veeder-Root counter must also be enlarged to receive the modified cable-end, and this can be done with a Dremel tool as well. Extreme care must be taken not to get the counter shaft too hot during the grinding operation or I risk fusing the gears inside. A shot of fluid from a can of "canned air" held upside-down cools things off nicely after a bit of grinding.


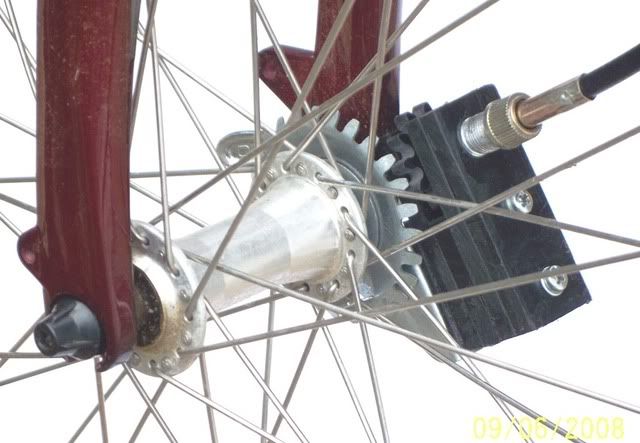
The chassis is to be mounted on the right side of the wheel with the cable routed above the fork, and the counter will mount on the left handlebar.

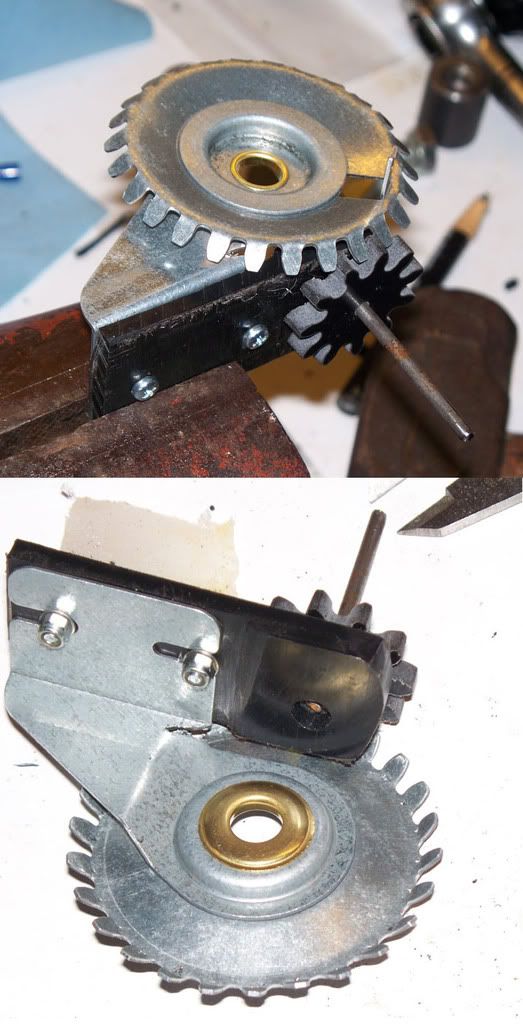
Overall I am quite satisfied with the gear engagement, and smoothness of operation. The same counter, chassis, and gear from the base model can be used with minor modifications, so little additional stock must be acquired beyond the cable pieces and plastic blocks.

I'll put a few miles on it this weekend if the weather holds (doesn't look too promising) and post my findings.

Best,
Tom
Last edited by peteriegel
The cable core of my JOL counter broke last weekend but my friendly cable guy was able to replace it. I didn't get any more length but he suggested I might have sufficient length to mount the counter on the mounting neck behind the handlebars rather than the frame top tube where it was before. By tilting the counter slightly to the left I was and could still read it. So far it seems to be working OK. All the to ask how is the cable driven Jones JR coming along?
I'm surprised Neville hasn't replied to any of these posts - perhaps he's laughing too hard.

I've pretty much settled on a procedure where I use my JOR to determine the overall length of the course, and the electronic counter to determine all the other splits. There are several advantages to this.

The electronic counter is easier to read (bigger digits, less of them) than even a handlebar mounted JOR counter.

But the biggest plus is the ability to calculate all the split points at home on a spreadsheet, then print it out before going to the course. Once I get there I simply record the starting count on the JOR, zero out the electronic counter, and start riding. Being able to start from a pre-determined zero count makes the ride so much easier. The only drawback is overshooting a mark, but that's usually due to my carelessness.
Tom and I have discussed the future of the handlebar-mounted JR counter. The present rig took many hours of delicate cutting and grinding to produce, and it does not look like it will be possible to make units on a production basis unless a flash of inspiration should occur.

Tom may supplement or correct this, but at present it looks like he won’t be producing handlebar-mounted units.
My old Jones - Oerth- Lacroix counter is being held together by some tape and wire these days. I have been scrambling around for helpful replacement parts. Laurent Lacroix has ceased producing counters, but has a small stock of various components. Paul Oerth passed away in 2012 and his son Stephen no longer produces their handle bar mounted counters. Both experienced a loss of regular component parts supply.

I must admit that my older eyes really appreciate the handle bar mounted counter. It is just plain easier to see.

If the old style metal gear drive has been replaced by a plastic version, why isn’t the plastic gear drive a workable solution for a handle bar mounted Jones Counter? Has anyone previously had problems with the plastic gear drive?

It is my understanding that the gear drive is made FRP-fiber reinforced plastic. These FRP plastics are pretty tough and commonly used in the automotive, aerospace and construction industries.
I recently tried my new handlebar mounted counter from Kevin Lucas during the Baltimore Marathon measurement. I carefully compared my measurements with my measuring partner Nathan Porch, who was using a JO Counter. In all cases, we agreed in our numbers.

It was great having the numbers where they are easily readable. The counter seems very well made. My hat is off to Kevin for the fine work he has don in the development and execution of this counter upgrade.

Add Reply

Post
×
×
×
×
Link copied to your clipboard.
×