
Decided to brave the 40-degree weather and rode 5 miles yesterday to test the new chain-guard mount, and to see if 49cc is enough to haul my big butt up the steep hill in the park. Success on both counts, although there was a little clutch slip on the steepest part.

So I'm going to call it done now... oh, wait, I'm not. Of course not.

Decided to crack open the primary drive and see what's in there:


A little double-row roller chain, swimming in grease. And actual bearings supporting the shafts. Good deal. And now that the cover's off, let's do something about that as-cast finish.


This is where we start. Finish as cast is reasonably smooth and should take a polish nicely.

<SNIP> Skipping over the intermediate steps of 80, 120, 220, 320, and first polish...


Mother's polish and Powerball. All it needs now is wax and final installation:


And there you have it. One polished primary cover.


Submitted without comment.
Minor update that turned into a much bigger project than it should have:


I finally have a mirror, so I can see all the people coming up from behind trying to kill me. But somebody who designs bike mirrors needs a good smacking:


Apparently, using a 3/8 rod in a 7/16 hole is considered "tight enough" and I'm here to tell ya, it ain't. I started to put this on as a quick project before dinner. Didn't know I'd have to re-engineer the bloody thing. Started by grinding a couple of flats on the shaft, so it wouldn't rotate when the sleeve was tightened down. Still not enough, way too much movement. So as you can see, I put a brass sleeve on it. Now the mirror stays put.

The rest of the mirror seems to be well made. I have no idea why they thought this sloppy fit was a good idea. End rant.


Also put in a fuel filter (smallest one I could find is still huge for this application). There's a screen in the tank valve, but that's only good enough to keep the big chunks of rust out. So a filter gives me a bit of carb insurance, as well as a visual indicator that fuel has gotten down to an "oh crap" level.

Note that the valve cover is missing. I got a plan for that.
Happy Christmas everyone!

Well, it was for me. I got a GPS mount for my handlebars:


(which I had to chop up a little to make it work. Garmin has a fairly vague notion about what fits their older products.) But now I know where I am, and can verify that the speedo is somewhat accurate.


Also wrapped the header with thermal wrap. This is supposed to keep exhaust heat in to improve scavenging and make mucho power. I guess it works, as there's only a 2-degree drop between the head and muffler. So that's nice. But I installed it so I can stop burning myself.

Went for another ride as it's ridiculously warm for December. The thermal wrap must work as we're now up to 28 mph at half throttle.
Ah, New Year's Day. A time for contemplation, reflection... and building stuff.

I decided that I want some real motorsickle-type foot pegs, so I went shopping. Strangely, nobody seems to sell foot pegs with a bicycle frame mount. Nobody except Lowe's plumbing dept.


Once I measured the frame (1.25 inches), I selected a tee that would fit. In this case 1 inch, as pipe is measured on the ID of the pipe. A little creative butchery (above) and it was ready to sit on the old water-bottle mount. The rest was just plumbing:


I had to play with lengths and angles so the pegs would miss the pedals and front wheel, while putting my feet where I want them. Now I can sit back a little, more relaxed than with feet on the pedals.

A Wild One, indeed.
quote:
Originally posted by Bob Thurston:
Foot pegs are brilliant!

This query from Safety Committee: would you consider putting traps on those bars to keep feet from sliding too far forward? Just a question; there may be good reasons not to do something like that.


Gravity and the heel of my shoe seems to keep my feet where they belong. Haven't test ridden with them yet (cold) but I don't see traps as necessary or desirable. A straight peg lets me put my foot down when needed.

As for cozy comfort, the exhaust pipe runs at 400 degrees. I'd probably end up buying a lot of shoes.
So, remember back in December when I said something about how I have a plan for the valve cover?

That plan has come together:


Thanks to knowing a certain guy with a Haas CNC mill in his garage who puts up with my crap, I've got myself a deluxe California-hot-rod style valve cover. I guess I can justify it by saying there's less valve noise now, but it's really for looks. And on that level, it succeeds brilliantly.
Well, it's (sort of) spring here in New England and we've been riding up and down hills (1 is 11%) since the snow, rain and cold inched its way out of here. All these hills reminded me of the motor bike projects that got put on temporary hold by similar conditions in the great mid-west. Beside the fancy chrome looking valve cover, are there any new developments or news?
No new developments to speak of. Went for a ride around the neighborhood the other day since it seemed warm, but at 20-25 mph it's not THAT warm. I did hit 30 mph on a level road, which is about as fast as I'd want. For a speedy bike, choose one with a longer wheelbase like dad's cruiser.

I noticed it doesn't like hot restarts at all; needs to cool off a bit before it will start easily.

Also, I took the foot pegs off. Between the pedals hitting my legs as they spun, front wheel hitting my feet on turns, and general awkwardness of going from pegs to pedals, it seemed safer to ditch 'em.

When the city re-paved the main road out of the neighborhood, they added bike lanes, so I have a nice smooth superhighway to the post office.
Performance update:

4 miles each way to the pharmacy, up and down a 6% grade going thru the park. Without pedaling I made 15 mph up the grade at near full throttle. Cylinder temp after the climb was 220. Hotter than I'd like but still acceptable.

A quick carb adjustment put paid to the hot-restart problem.

Took the sidewalk to avoid the worst of the traffic, so the last half-mile went by at 10-12 mph. The rest was at 25 mph. Made it back home a little faster than if I'd driven (I scoff at your stoplights).

Hands are a bit tingly from the vibration, but the seat is doing its job admirably.
48-mile update:

Some time ago I started having a problem with the (engine) drive chain popping off at inopportune times (is there a good time?) and also noticed my spiffy high-performance air filter was getting squashed against the frame. So obviously the engine moved somehow (that "how" part's not so obvious). Time to bust out the wrenches and pretty much start over. This is the result:


The engine now sits about an inch higher, and an inch forward of its former position. This presented several problems (and solutions) and solved some others.

Problem #1: Now the stupid chain is too short. Will I have to order another master link? No. I had enough parts with the half-link's hardware to solve this one. Forgot how much fun it is to bust the chain apart (none whatsoever).

Problem #2: The chain gooped up my whitewall.


Fortunately you can still buy Bleche-Wite.

Problem #3: Can't turn on the fuel feed because the lever hits the spark plug now. Solution: move the tank forward. This also gives me some "ball room" when stopped. Had to lose the headlight battery, which I'll think about later. So far I haven't ridden at night. People are goofy enough during the day.


Pictured: ballroom. Also note that I can actually get the dipstick and drain plug out.

Problem #4, the big one: Got everything installed and engine running, but I can't turn the choke off. The lever hits the top tube. So start over and reposition everything again? or MacGyver workaround? Hell there's always a Plan B. In this case, break off the choke lever, drill a hole in the shaft and make a new lever from safety wire.


MacGyver's choke.

Since there's no longer any friction to hold the choke in either position, I made a hook at the end to hang on the throttle cable. This holds the choke full open once the engine is running. I may revisit this later once the shame of this crude solution catches up to me.

There are still a few minor things to do. Oil is puking out the breather at the back rather than being sucked into the carb, so a bit of sealer will go in. Chain tensioner could use a tweak as it's now in a new position and the angle is a bit off. But neither of those will "red-line" it.

As a bonus, my left foot no longer hits the transmission when pedaling.
New Fall Colors!


After riding for a while, I've determined that while the bike works, there were still a few things to be worked out. I set about eliminating all the wire wraps and cable ties holding things to the frame, or as many as I reasonably could. Chief among them were the brake noodle (automotive brake line) on the top tube and the ties holding the throttle cable.


Now the brake line is brazed to the tube, and the throttle cable clipped on with short tube sections. The brazing burned off the paint, so a respray was in order. International Safety Orange to match the lettering on the tank.


While I was mutilating the frame, I drilled a couple holes to run the power leads for the headlight inside the tube, protected with grommets. I still have to terminate one end. This way the battery is behind the seat post, out of sight and out of mind.

Still a couple small things to take care of, but I like the way it's looking now.
Almost 9 months since the last update. What a slacker.


Since teaching myself to MIG weld, there's (almost) no end to the things I can do on this sucker. (I can't weld onto the frame since that's chrome-moly and you have to TIG that stuff). Since I changed the exhaust tips on the truck, I had these big stainless (for a given value thereof) resonators laying around. Picked up a length of 3/4-inch conduit at Lowe's, did a little bending and a little welding, and now this thing has a rumble to it. Sounds a lot meaner than it is, but that counts for something, right?


Made a chain guard to keep my pants clean. Steel shelving supports already have speed holes, so that's what I used.


Made a support for the new Chinese headlight (fits chopper bobber Harley Davidson) and installed a 2-way switch. Low is pert near useless, but high lights things up nicely.


The headlight alluded to earlier.


And while I was painting things, I gave the brain bucket a makeover. Unfortunately it doesn't help with the "looking like a goober" part of helmet-wearing but it's a step in the right direction.

Forgot to take a pic of the fenders. Later, I promise.

Next step is a new front brake. 300 pounds of bike and rider plus 30 miles an hour is more than the rim brakes can handle. But since I'd have to change the fork to install a disc brake, I'm going with a Sturmey-Archer 90mm drum. Which will give me a chance to learn how to lace wheels. Stay tuned for that fun-fest.
Give me a brake...


Specifically, a great big drum brake. I selected this because I wouldn't have to change the fork for a disc brake. But then, I changed not only the fork, but the whole damn frame:


That's a brand-spanking Electra Cruiser One, single-speed coaster brake. Selected because it's six inches longer than the Hardrock, and the seat post sits 3 inches lower. Note that the pedals are set forward as well. Should make a good conversion.

It ain't all roses, however:


The brake hub's instructions tell me to select a brake-lever clip. Well they only gave me one, and it's far too small to fit the Electra's fat fork. So I bent up some steel and welded a tab on to hold the arm.


While I had the welder warmed up, I had to extend the engine mounting plate. Still need to drill holes for the engine, but that will come after the wheel is made up and mounted.

Wait, your new bike didn't come with a rear wheel?


Well yeah, it did, but I can't resist changing things. Low-end bike parts are cheap, and fun, so I'm downsizing to a 24-inch rear, which allows me to use a low-pressure 24x3.0 tire for a smooth ride. You can see the difference in diameter from the 26x2.125 black tire behind it. Smaller diameter, better acceleration and less stress on the engine.


The other snafu I encountered was the bottom bracket. The bike comes with an American-standard crankset (like an old Schwinn) and my wide 3-piece crank is Euro standard. Fortunately adapters are available so that's sorted.

I'm at a bit of a stopping point here, waiting for things to show up. But I expect to be back on the road in a month or less. Stay tuned.
quote:
Originally posted by Duane Russell:
Hobbies sure can get expensive, both in cash, and time.


Fortunately, I am blessed with a sufficiency of both.


Now we see some real progress. We can add "painting a spoked wheel" to the list of things I don't want to do again, but the results are worth it. Front wheel is a place-holder. Even barefoot, I can get both feet flat on the ground. Tank is positioned for maximum ballroom. As we said in the 1970's, it's looking boss.

With the rear wheel on, I can see where the chain wants to run and position the engine appropriately. New holes drilled in the engine plate, which is now in the paint booth.


My position on preserved immature cucumbers has not changed.


Leftovers get re-cycled. Get it? Me so funny.
Progress!


The engine is in, plumbed, wired and running. Made a new exhaust today.


I needed a bendy part to get over to the right side. Started getting out the torch and then remembered the old handlebar I had laying around. Does the trick nicely. The muffler now clamps on, so I can actually get it off without cutting either the exhaust or the chain.

More to come, stay tuned!
And more progress!


It is now provisionally alive. Which means it runs and drives, but has no front brake (waiting on spokes so I can build the front wheel). The coaster brake is capable of locking the rear wheel, which is more than I can say for the old bike's rim brakes.


Spiffy aluminum bottom-bracket adapter (US to Euro). Would have been nice if the motorbike-parts people would have shipped a US-spec wide crank set like they show in the catalog, mumble mumble...


Battery for the headlight. There's an LED blinky light on the seat post that has its own battery.


Rear fender, banged out to the proper width to cover the tire


Black krackle paint on the engine cover. I love this stuff.

And yeah, that fuel line really should be orange. Little stuff like that bugs me more than it should.
It's all over but the crying:


My spokes arrived and I managed to get the front wheel built. Guys who know how to build wheels will tell you that building wheels is the mark of the Elite Bike Mechanic, but that's what you'd expect them to say. What they don't tell you is that it ain't that hard, once you know the trick.

They also say you need the Elite Bike Mechanic truing stand so you don't build a wobbly wheel. But you can make one out of wood in about 10 minutes. Maybe I'm an Elite Carpenter, too.

The hub brakes work much better than the old rim brakes. I can stop in about 2/3 of the distance than before.


At this point it's pretty much done. There's still some fiddling to do, and maybe a chain guard.

Top speed is down from before. I'm at about 24 mph because of the smaller rear wheel, and the low-pressure tire has more rolling resistance. Plus the bike is heavier. But if I was after speed, I'd put one of those 212cc Predator engines in, with a golf-cart transmission.
Time for an update, and some Mel Brooks Mohel humor.


It's the latest rage, the ladies love it! That's right, I decided to "soicumsize" my muffler. Like so:


The bit I cut off is on the floor. That style of tip is called a slash cut, and it's accurately named, especially if you're not paying attention.


Yeah, that hurt. So the pipe is cut back and filed smooth so it doesn't happen again.

Saturday I turned up at Mike's seminar and met some of you guys again, and some for the first time. And Mike gifted me his 4-stroke, which he couldn't get to work properly. I noticed all the castings are different from mine, though the carb is the same.

Another update is coming, so stay tuned!
For a while now, I've had a problem with the engine barfing oil out the ventilation hole. The harder I ran her, the more she'd barf. So I put a plan together, then Mike cocked it up by giving me an engine that (so far) doesn't barf anyway.

But a plan is a plan, and so I executed the Puke Mitigation System (PMS).

The crux of the problem is that the engine's just hammered. Oil shouldn't look like this:


That's about 4 hours of running, and the oil is chock-full of aluminum. No bueno.


Step one was to screw the engine to the table and make sure it runs. Then switch over all the bits I want to re-use, and catalog the differences while I'm at it.


One difference is that the clutch housing is shallower, so the bell rubs on the crankshaft. Some washers spaced it out just enough.

Then it came time for serious PMS installation.


I started by restricting the inlet side. Instead of a 10mm hole open to the outside, I cut slots in this tube. The tube is jammed all the way into the crankcase, so the slots (which are at right angles to the oil spray) are the sole source of air getting out.


New restricted pipe vs. old unrestricted.

Air that gets out, goes to a bit of AN hose that I had leftover from another project...


And down to an air-compressor oil separator. This should still work even with drastically less air than it's designed for.


Pure clean air is filtered before release.

I do realize that this whole PMS business is massive overkill, but I like massive overkill.
The adventure continues...

Dissecting the old engine (which shares no parts with the new, despite being drawn from the same Honda engine) I noticed this chamber above the crankcase:


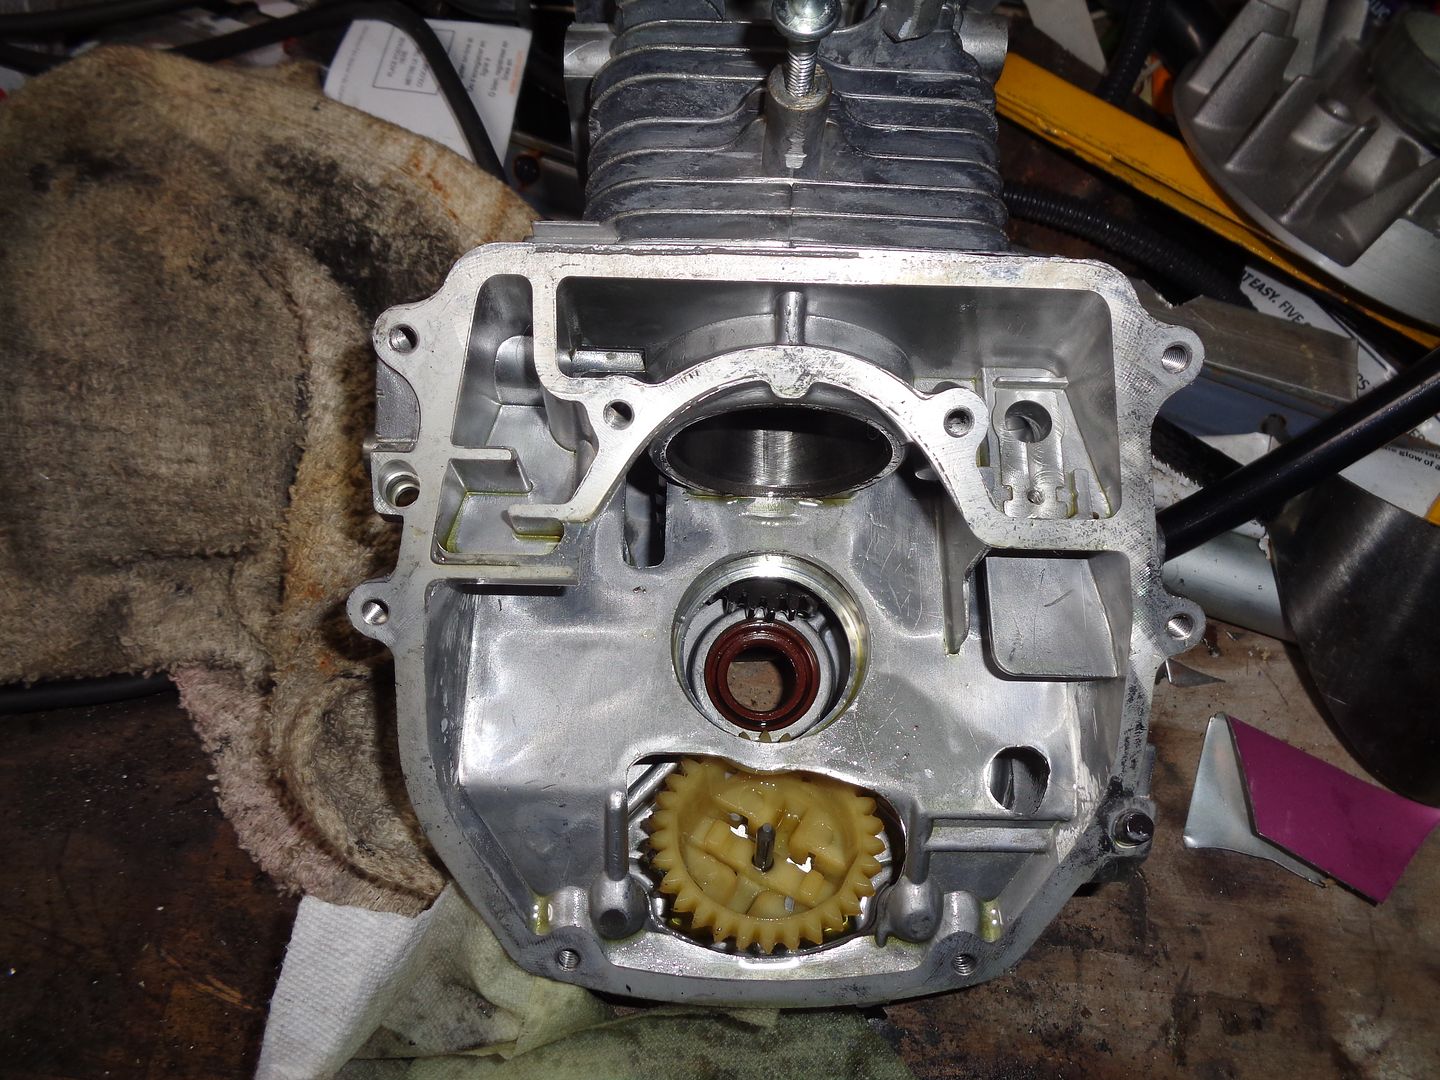
The small hole on the right side of the chamber communicates with the crankcase proper via a flapper valve (removed). The chamber's outlet on the left goes to the atmosphere (or the PMS). My previous breather was a simple tube going up to the air cleaner, about 4 inches higher than the chamber's exit. This tube managed to fill up with oil and puke it into the air cleaner, necessitating the last post.

As you can surmise, there must have been one hell of a lot of blowby to get oil up into the chamber and up the tube to the air cleaner. So I'm really glad to have that new engine, which so far hasn't puked any oil at all.

I rode to the post office, 2 miles each way, but had an incident on the return trip. The chain tensioner wants to go walkabout, forward on the chainstay, and loses tension enough that the chain then jumps. So I went to work on that:


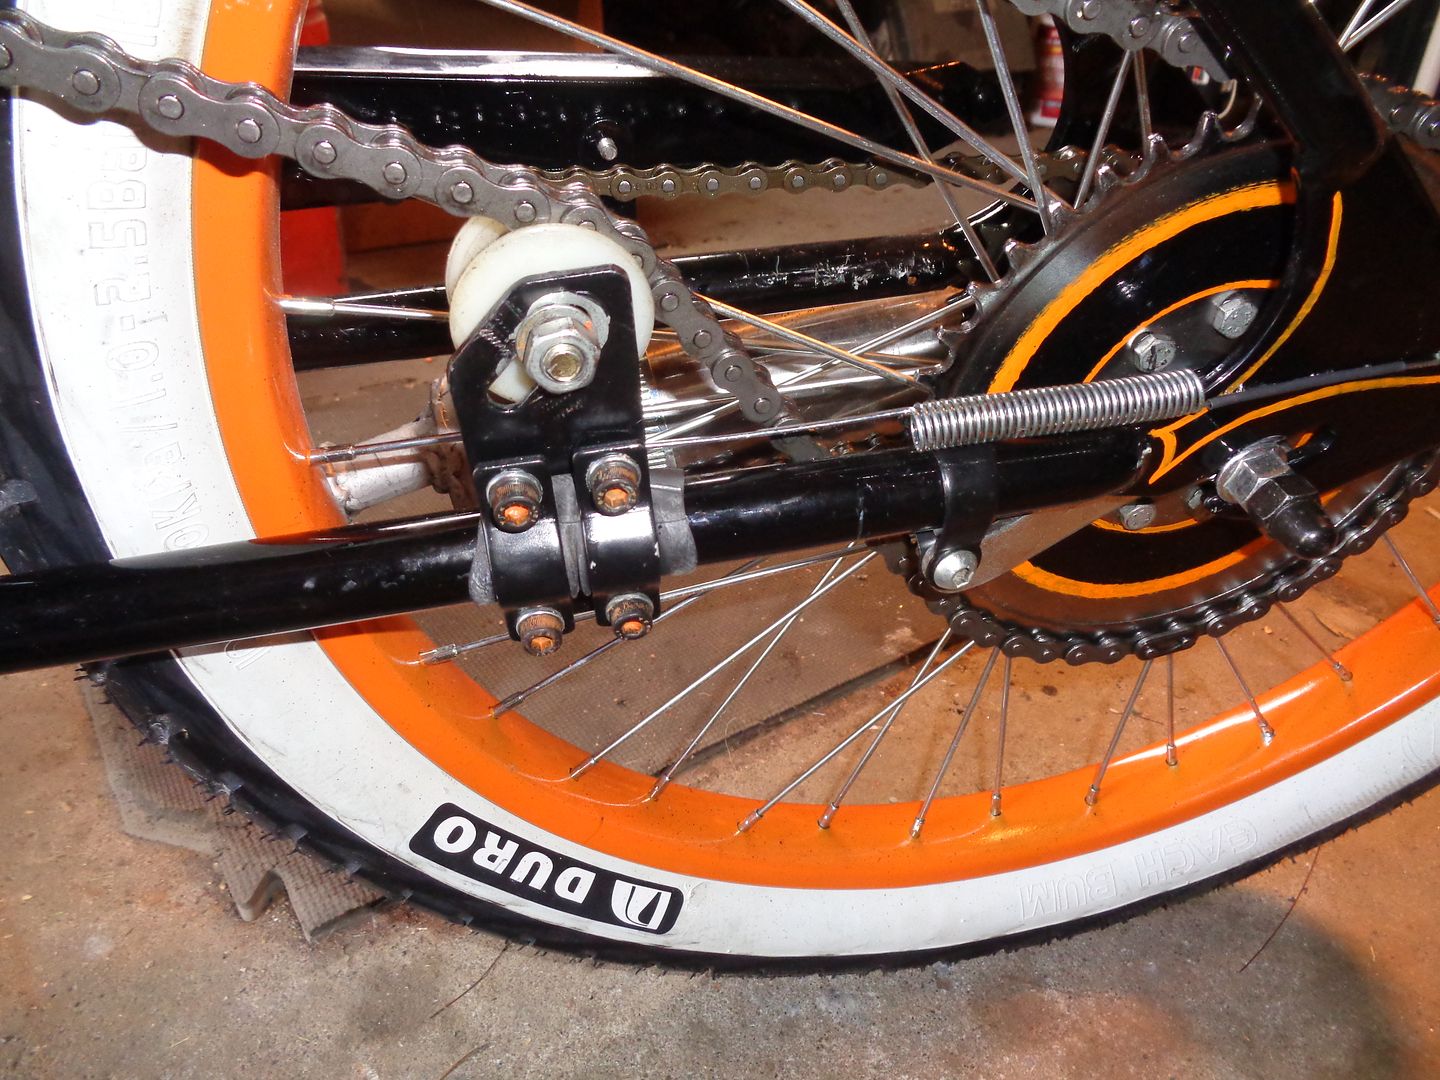
Problem is that the paint is just too glossy for the tensioner to stay in place. So I wrapped a bit of leaky old inner tube around the chainstay, with a bit of contact cement to keep it in place, and reinstalled the tensioner. The spring should help, too. If this doesn't work I'll weld the little booger in place.

Hey, speaking of welding:


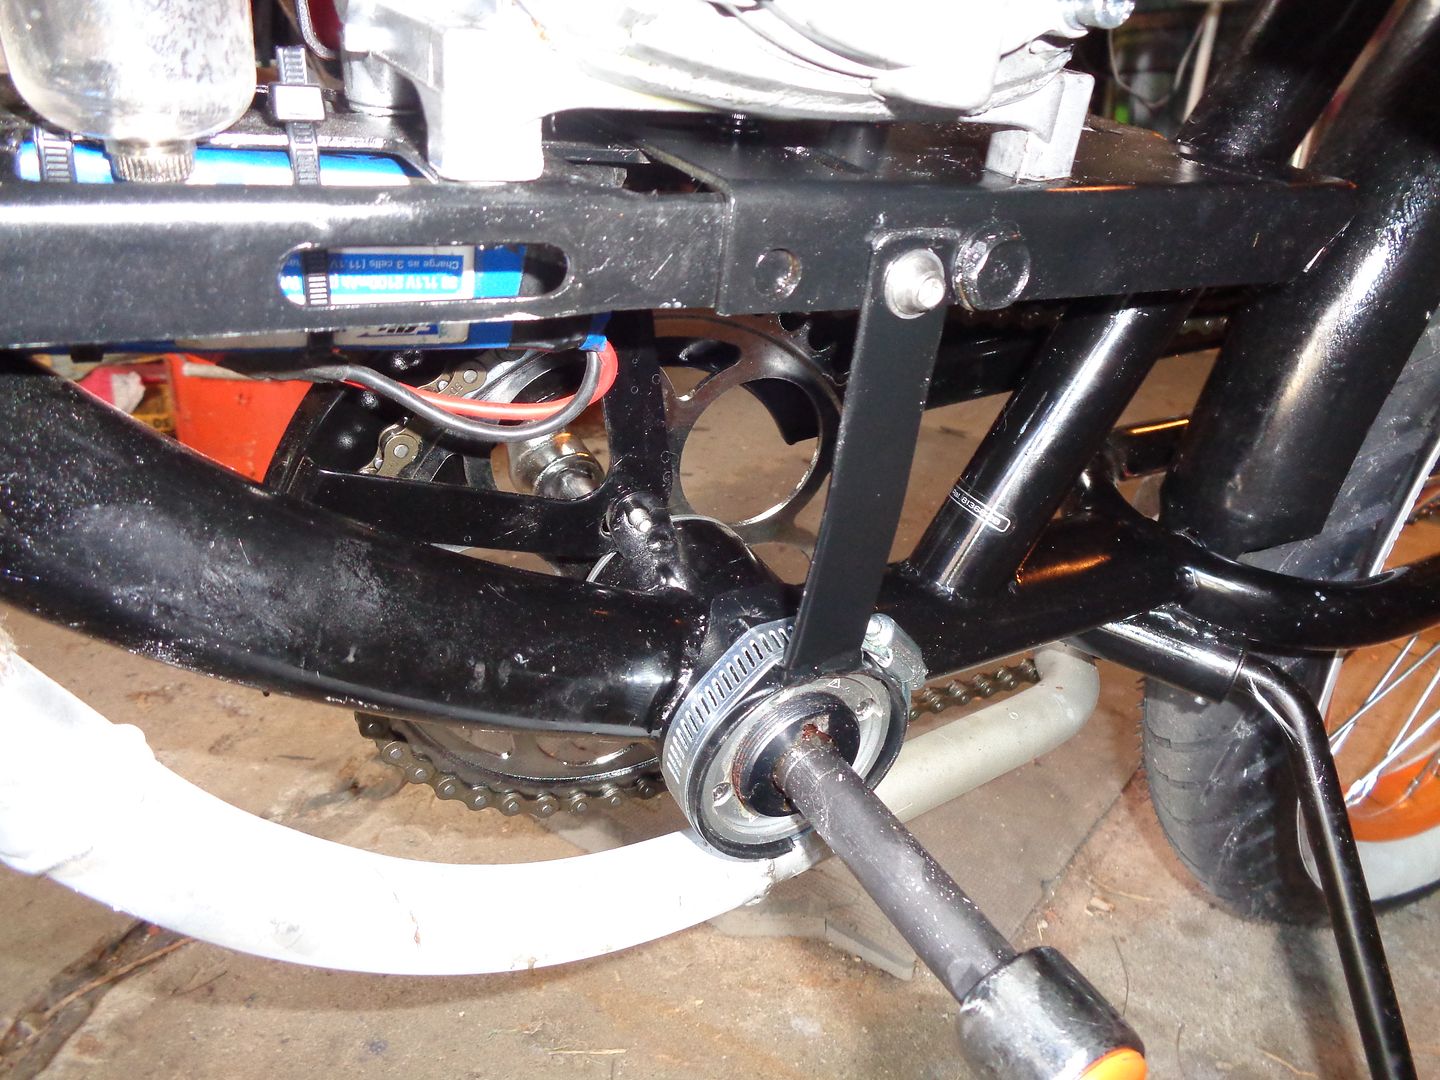
This is a vertical brace made from steel strap and some exhaust pipe. It keeps the engine from rocking side to side. The exhaust pipe wraps around the bottom bracket, and a hose clamp keeps it tight.

In other news, the high-speed misfire is gone. I changed the magneto after noticing the one that came with the new engine is larger and heavier (meaning it's got more copper in it). Now I've got a stronger idle, and the engine pulls nice and hard all the way up to 32 mph.

Now all I need is a Marlon Brando leather jacket.
Bob, the bike runs a single-speed primary drive at 5:1, with a further 4:1 reduction in the chain to the rear wheel, so overall it's 20:1. This means the engine runs at about 6500 rpm at 30 mph. A multi-speed gearbox would yield a higher top speed if you're feeling really frisky.

Mike gave me this engine because it wouldn't work for him; I determined that was because it came with a 3:1 primary for a 12:1 overall ratio. With a 26-inch wheel, that would yield a top speed around 55 mph, if the engine's 2 hp could overcome aero drag at that speed. But the high gearing killed Mike's clutch. It's like trying to start your car off in third gear. You would have to pedal up to 15 mph before revving the engine.

I don't know where he got a 3:1 primary. Maybe it's meant for a BMX bike, or something else with a very small wheel.

For multi-speed bikes, there is a jackshaft kit which does away with the chain from the engine to the wheel, and uses the bike's chain and derailleur. I don't know exactly how those work, or if you have to pedal like a madman to keep up.
Cue the "sad trombone" sound effect.

What was supposed to be a quick run to the drugstore turned into a troubleshooting and repair session rather quickly. Cruising at 30 mph, I suddenly lost drive.

Since the clutch bell had failed once, I figured my repair had failed, and pulled the primary drive off. I did not expect to see this:


Top: sheared input shaft. Bottom: Booger-welded clutch bell still holding strong.


Yeah, pretty sure that's supposed to be one piece. Don't think I can weld that (though I may try just on general principles). A new shaft costs a whopping $15.95, and a new clutch bell a further $11.95, so no big deal there.

I suspect the shaft broke due to all the whacking it took getting the clutch bell off before I figured out that it simply unscrews, although it was threadlocked pretty thoroughly. Anyway, new parts are on the way and I should be back on the road soon.

More worrying is the performance of the coaster brake and pedal drive. As I pedaled home, there was a lot of slipping. Adjustment has not improved things; it seems the drive surface of the wheel has had all it can stand.

I've been lurking on motorbike forums and it seems this is a common problem with coaster-brake hubs at high speeds. I am seeking an alternative, and with winter coming I'll have plenty of time to wrench on it and figure it out.

Finally, I bought a new brain bucket:


This is actually a snowboarding helmet, but it has twice as much padding and a better fit than my old one. If it can protect a downhill skier at 60 mph it'll protect my melon at half that speed, and unlike bike helmets it doesn't look like a permanent bad-hair day.

Stay tuned for further developments.
Bob, I think this is a case of re-purposing without re-engineering. The primary drive comes from a Chinese scooter, which uses a 10- or 12-inch wheel. The fact that the part is readily available tells me that mine isn't the first to fail. I suspect the ultimate cause lies in the material; Chinese steel isn't exactly famous for durability. We will see how long the replacement lasts.

The coaster brake is being replaced by a freewheel hub and external drum brake. The freewheel has a thread-on adapter to accept the engine-drive sprocket, so I can do away with the rag joint holding the sprocket on, and spread the load over all 36 spokes. Ultimately it will be an improvement, but it means I get to re-lace the rear wheel. Fun times.
About time we had an update, yes? Got a big pile of parts that kinda-sorta work together, beat on them for a while and got everything to play nice.


New rear brake installed, which works better than anticipated at least at pedalling speeds. I had to smash, bash and grind the housing to make it fit the frame, and tweak the linkage to clear the chain. You're meant to run the sprocket facing the other way, but if I did that I'd have to move the engine over, and then the chain would rub the tire. So a little bending was in order, kind of typical for this build, making things work.

Example:


The brake's pivot bolt wants to rub the sprocket. I discouraged it with a file. The new sprocket is 50 teeth, up from 44, so I'll sacrifice a little speed and gain pulling power, a fair trade.


The sprocket mounts to a freewheel (reverse thread) with five bolts and no rag joint. The pedal sprocket has a freewheel, too.


The bigger sprocket meant I had to embiggen the chain. Kind of janky, but it should work okay.

Now this is the kind of thing that really bugs me:


Each Bum? Really? Was another B too expensive for ya, tire-mold guy?


Front tire is a matching 26-inch Beach Bum. so both ends roll on low-pressure rubber now. At least they spelled it right on the black graphics.

Went for a pedal and it still slips. WTF?


This could have been the problem all along. The crankshaft spins inside the sprocket. Gonna have to weld that.

Add Reply

Post
×
×
×
×
Link copied to your clipboard.
×